How to Draw a 3d Point on a 2d Plane
A curtailed drawing tutorial touching on all the fundamental principles of drawing in perspective.
In the previous drawing tutorial episode we explored ahow second shapes make up a discipline. In this cartoon tutorial nosotros're shape shifting into another dimension!
It's a topic that might be alien to some of y'all, but we'll exist cartoon 3D Shapes in i, ii and 3 point perspectives... and, we'll learn how to accurately forshorten objects.
This is a discipline that requires some focus as information technology'due south more than technical than other topics. Information technology's a subject that tin be hard to grasp and needs to be done right.
When nosotros await at an object or a scene, we notice it varies depending on our perspective; the advent of an object is all relative to the perspective or viewpoint. Then what does perspective officially hateful?
According to Google: "The art of representing three-dimensional objects on a ii-dimensional surface so as to give the right impression of their superlative, width, depth, and position in relation to each other."
Then we basically need make sure the perspective is correct, because every fourth dimension you create a drawing for someone else to come across, they are viewing the object, or scene through the lense that yous create for them. And it needs to look authentic, unless you lot're an abstract artists, because y'all're not required to accurately describe reality. However, if information technology'due south a real scene you lot're portraying and some of the relationships between these objects aren't accurate, then the image will interruption downwardly.
The scene will await flat, and and then we're shape shifting back to second apartment images, information technology's all about creating magic that people believe in! Anything that feels unnatural, or out of place instantly breaks the viewers date and emotional connection to the drawing and they're taken out of the scene.
The most important 2 things y'all need to think in all of this is:

The Horizon line
-
This simply represents the eye level of the viewer.
-
There tin can but ever exist 1 horizon line.
Vanishing Points
-
The betoken at which receding parallel lines appear to converge.
1 Point Perspective
So let'south start with the bones type of perspective…
Hither'south an a simple image of ane Point Perspective taken from the motion picture Tron. Information technology has a unmarried vanishing point and a single Horizon Line.
So to create our own ane Point Perspective drawing, Permit's start by giving the 2nd image a identify in a 3D environment.
- Establish the horizon line. This is the eye view level that nosotros are viewing the shape, or soon to be cube. Are nosotros looking to a higher place the Cube? Below it? If we're looking to a higher place the the shape, he horizon will be lower down. If we're looking beneath the shape, the horizon line will be to a higher place.
- Plant the vanishing signal on the horizon line, a point that we're looking down towards. This is what ultimately determines which side of the cube appears to is. And then identify the dot on the horizon line, this will make up one's mind our Vanishing Point.
- Draw the shape anywhere on the canvas
- Extend the lines from the edge of the shape so they converge towards the Vanishing point.
- Fill in the lines to determine the length of the new visible edge. Now nosotros accept a cube in a scene! Now yous know 1 point perspective.
You can practice cartoon in perspective by Generating tasks for you lot to depict. It prompts you with random coordinates and shapes to place in 3D space on the perspective grid. (Click to download!)
At present yous're on you way to understanding perspective drawings!
2 Betoken Perspective & Measuring Points
2 point perspective is the most common type of perspective used in a scene, it's more dynamic than 1 point perspective as it has multiple viewing angles.
By drawing perfect cubes in perspective, it means that we can utilise them as a base to determine the shape of more than complex shapes with better accuracy and efficiency. In order to get that perfect cube nosotros need to understand how to institute measuring points. These points will requite u.s. perfect measurements for the sides of the cube within the 3d space based on the 2 viewing angles.
Pace by step guide:
- First nosotros need to find the Horizon Lines & Vanishing points.
- Next we place a vertical line somewhere across the horizon. This is wher ethe commencement edge of our shape volition appear, it'southward also where we will find out Distant Point, the bespeak where nosotros determine our measuring points.
- Now nosotros have a right angle square over verticle line.
- Place one of the side on vanishing point 1
- Then place the other side on Vanishing point 2
- And and then brand sure the corner point of the right angle falls on the showtime verticle line
- Now to establish the Measuring Points nosotros demand to:
- Connect 2 lines from each Vanishing indicate to the Distance point
- Then overlap the length of each line ba6ck across the horizon
- The ends of these lines determine our ii measuring points
- Side by side we need to make sure the viewing angle is no greater than 120 degrees or the shape volition look distorted (not ideal for a cube)
- Nosotros and then decide what the full length of the first edge will be!
- Nosotros and so copy it twice and identify them in a mirrored formation at the base of our first edge
- The edges of these 2 new lines volition and so connect to our measuring points
- Now we tin begin to build upwardly our 3D cube based on the foundation lines established
- Extend all of the remaining lines from the edges of the shape towards the vanishing points.
Now you should have a cube in perfect 2 point perspective!
three Point Perspective
Ok so 3 Point Perspect is similar to two Point Perspective, but you tin guess what the difference is no dubiousness!
There'south a threerd vanishing bespeak, the main differene is that information technology's not placed on the horizon line. It's usually placed above or below the horizon depending on the viewing angle you desire to achieve.
When creating a shape in iii Indicate Perspective, you tin can start out past utilising the steps from the 2 bespeak perspective procedure, especially if yous want to create a cube with authentic dimensions.
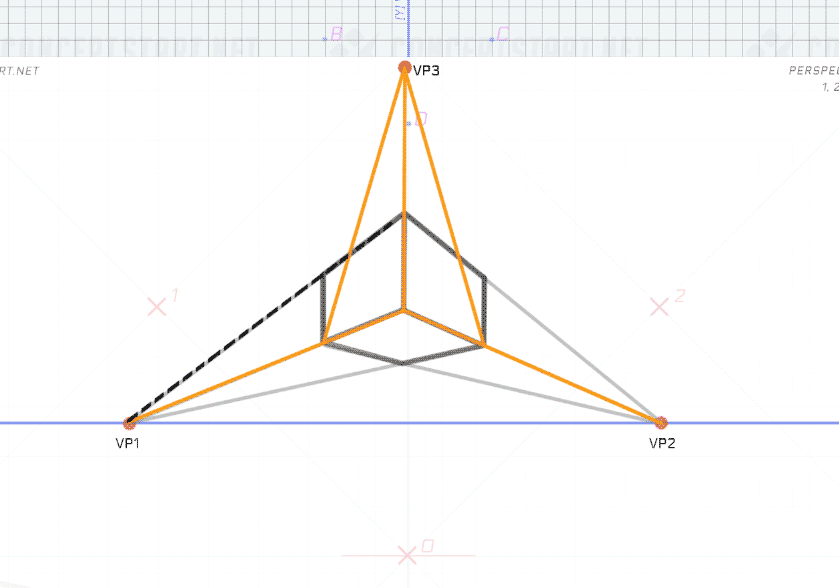
- Follow the steps for 2 point perspective
- Add the 3rd vanishing betoken
- Extend guidelines from VP3 through the points of the front corners of the cube to determine their shape within 3 bespeak perspective environment
- Redraw the lines of the cube
What I have noticed is that this process is essentially creating an illusion of 3point perspective, considering if yous were to extend guidelines from the third vanishing point up through all of the corners, and so the shape is non coherant. We're only concerned with the front facing side of the cube. This is the simply affair that we're concerned with considering it's the merely thing visible to the viewer. It'southward an illusion, and ane that suits the states artists.
Understanding truthful 3 point perspective would require you lot to establish measuring points for the edge of the cube, which isn't so practical for artists.
If you want to describe other shapes that aren't necessarrily a cube that has equal dimensions, information technology would be an option to depict in all 3 vanishing points first, and then build up the shape inside all of these guidelines.

Step 1
Follow steps from 2PP

Step 2
Add in tertiary VP (*See 3PP advice)
Step 3
Establish new perspective lines.
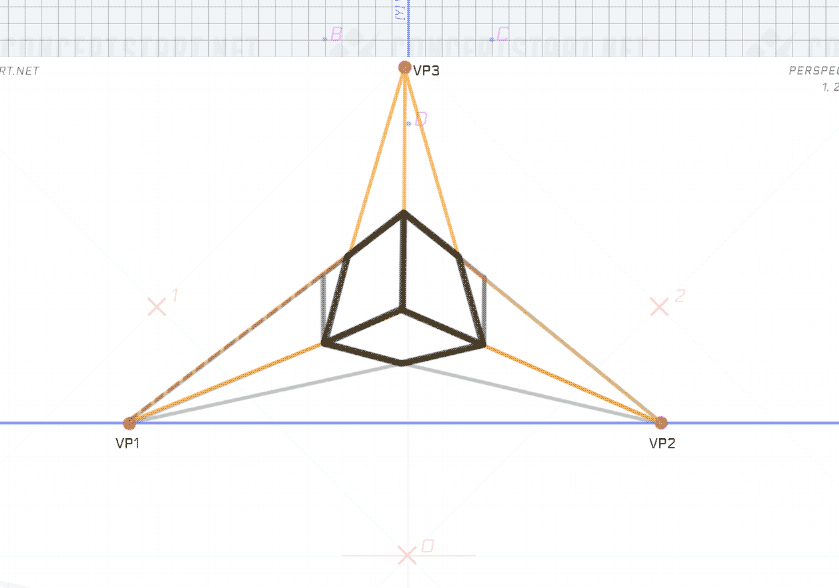
Footstep iv
Finalize 3PP shape lines.
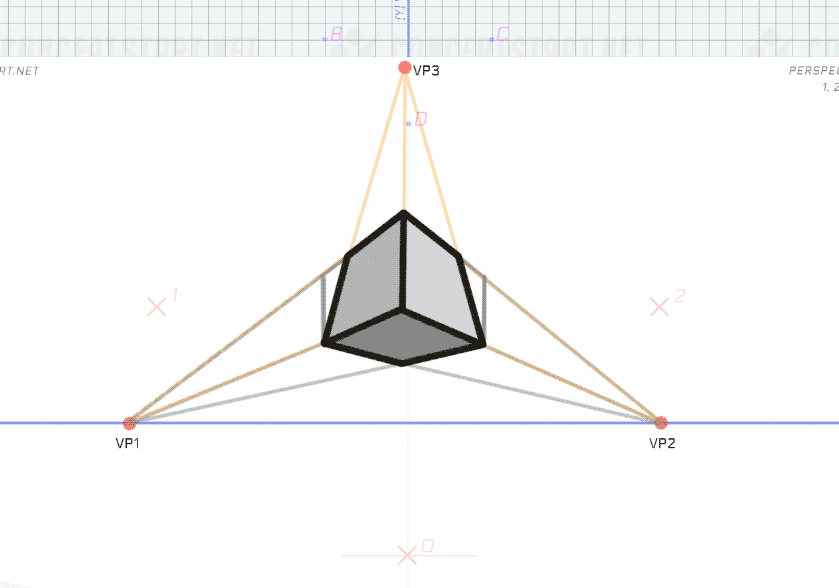
Step 5
Add in shades for book.
Cardinal things to consider in 3PP
-
iii Indicate Perspective is normally used in comics to demonstrate height so the 3rd VP should unremarkably above the shape, and in a higher place the horizon line.
-
If the viewing angle is from the perspective of a persion in a scene at basis level, then it would be best to place the tertiary VP in the centre of the horizon line otherwise the shape will distort and look odd.
Foreshortening in Perspective
Before nosotros go we finish up, at that place's 1 more than valuable piece of data which yous need to sympathise and that is altitude inside the perspective.
Distance has a manner of breaking down the length of things in a ready rhythm. See this edifice here, the with of each window gets smaller and smaller the further into the distance it goes.
But how do we piece of work out these dimensions for our ain scene? Ok and then let's go back to our cube! And extend information technology correct back…
All of which tin can be measured using the Vanishing points in relation to the lines of the object. Ok so what we need to first is establish our cube, we'll use the 1 from the previous demonstration…
- Find the middle point of the front facing side nosotros desire to extend, cross the diagonal froms each corner of the cube to get the heart point
- We run a line from the vanishing signal through the to the middle indicate nosotros created, there'southward an intersection signal where this newly create line enters the cube
- Then nosotros need draw a diagonal line from the summit corner off the cube, through this new intersection point
- Then we draw a vertical line upward upward to go the new height
- Then dorsum downward to the bottom corner to creat a new mid point
- From here, we keep subdividing down the central line towards the vanishing betoken...
- Finally, we overlay our structure lines with newly established foreshortened edges.
- Step 1,2 & 3: Find Middle Betoken
- Step 4: Cross Line for Edge
- Stride five: New Middle Signal
- Step 6: Repeat
- Pace 7: Perspective Lines
- Forshortening Complete
So this is foreshortening in perspective! It can be practical to whatsoever tpe of perspective drawing, with 1, 2 or three vanishing points! Simply call up to follow the procedure outlined here and information technology should all exist relative in relation to your grid.
Next Steps To Comeback...
Exercise Drawing in ane,2 & three Point Perspective!
Perspective is something you demand to practice to become fluent at. You need perspective for a broad range of drawings and paintings from environments designs, grapheme designs, mechanical drawings such as vehicles, props and so on.
It's used in everything so yous need to larn it, understand it, and brand sure information technology's accurate! Glitches in your portfolio volition bring everything else down, no thing how well rendered it is. So information technology needs to be learned properly! Yous can practice drawing in perspective by solving tasks generated with the Perspective Cartoon Job Generator. It will prompt y'all with coordinates for all vanishing points, horizon line and various types of shapes. You can likewise download the .PSD grid that works in conjunction with the cartoon task generator.
At that place'south also varying levels that y'all can go through as you meliorate, for now Level one focuses on more elementary shapes and eventially Level ane and Level 2, 3 will focus on cartoon more complex shapes, merging shapes and objects and then so on!
![]() Video Tutorials
Video Tutorials![]() Task Generators
Task Generators
Source: https://www.conceptstart.net/art-tutorial/drawing-3d-objects-in-1-2-3-point-perspective
Post a Comment for "How to Draw a 3d Point on a 2d Plane"